Loaded for Springfield.

It doesn’t look like it, but that is the entire layout and our Fast Tracks booth in the back of the van. I loaded everything today for tomorrows trip down (over) to Springfield.
Hopefully the layout will fit in the space we have at the show, there is a chance it won’t and might have to sit out the show in the van. Sure hope not.
The picture is a bit blurry as it was absolutely freezing outside.
-T.
Boxcar Carbox


I finished off the CarCarriers last night with a bit of stenciling on the lids. I used some of the same stencils I had left over from stenciling the crate that the layout sits on.
They are now full of cars, 35 in total, ready to make the trip to Spingfield this weekend!
-T.
Re-Post
I made a post a some time back about cutting the necessary electrical isolation gaps for the complex trackwork in the terminal. Over time it has gotten buried in the posts and since it is a question that comes up quite often I thought I would re-post it here. I have also created a category on the right hand side of the site called “Cutting Gaps” that will keep this post easily accessible.
The gaps in the PC board ties were all cut with a triangle file. The gaps in the rails are all cut using a jewelers saw. Using a jewelers saw allows the blade to be removed from the saw and slipped between the ties and then re-attached to the saw. The rail is then carefully sliced using a fine blade. This leaves a very thin gap that is almost invisible. Since the rail is soldered to all PC board ties, there is no chance (OK, little chance) that the gaps will ever be able to close up, so no filler is necessary.

Gapping complex trackwork.
The number one thing I get asked about when someone sees this trackwork is “how will you wire this?”. Seeing all those frogs it looks very complex but once you understand the basics of where to isolate sections of track you develop an eye for where to cut the gaps.

I design a lot of complex trackwork and part of the design is determining where modelers will need to cut gaps to have the trackwork operate properly. DC or DCC, the gapping is the same when building ultra-reliable track. To have trackwork (turnouts and crossings) work without shorts or equipment stalling it is necessary to “cut the frogs out”, that is to completely isolate the frog from the rest of the turnout and feed power to the frog independently from the turnout. Power is supplied to the frog from either a switch machines contacts or from a ground throw that has contacts on it.
The link will show a animated rendering showing how this works….
Rendering illustrating switching power to a frog.
The “polarity” of the frog is set to match either the “north” or “south” rail depending on which way the turnout is set. The same is true for multi frog trackwork. Each location where two rails cross each other (frogs) will need to be isolated from the rest of the track and powered independently based on the route selected.

Image Copyright (c) 2007 Tim Warris
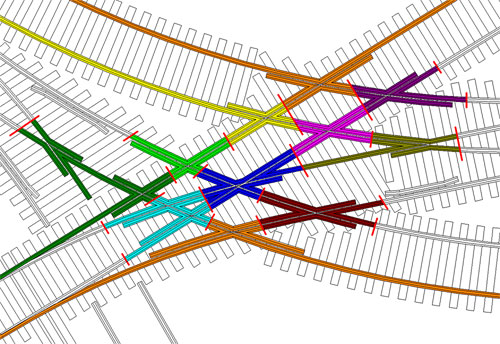
What I have illustrated here is all the different frogs in the first section of trackwork I built. The gaps cut through the rails are shown in red. After studying the drawing for a while and thinking how a train would run through the trackwork I determined where each frog would have to be cut using a jewelers saw. (Link to article on this technique)
Power will be fed to each frog from the contacts of switch machines relative to the route selected. Additional contacts will be needed and will be supplied from relays connected to the switch machine contacts.
It isn’t as difficult as it appears, but when complete there will be lots of wires feeding all the different frogs, which does make it appear complex, but in reality it is the same circuit repeated several times. You end up with stuff like this…

But it runs 100% reliably!
-Tim
Gap Update
Oops.
A sharp eyed modeler pointed out a mistake in the gapping in the section shown above. The Blue/Pink/Green frogs can all be a single section, like in the image below….

The logic being that only a single train can travel over the entire pink section at a time, therefore it isn’t necessary to isolate the three frogs, it can be left as a single section.
Thanks to David at The Gauge for pointing this out. It will save a few wires!
-Tim


