First step

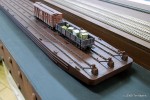
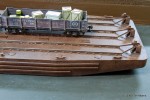
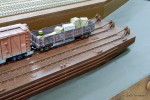
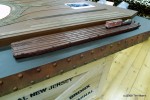
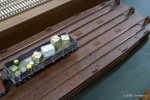
With the construction complete it was time to do some painting. I intend the create the look of a carfloat that was used hard and put away wet, which, of course, they all were.
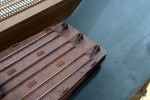
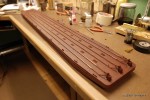
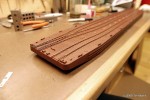
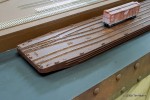
To start, I decided to use a similar technique to what was used on the fascia of the layout. That starts with a coat of light rust coloured spray paint. Once dry, a few wash coats of a purple/redish/grey are painted on and blotted off with a sponge.
This is as far as I have got so far. Its a good start, and created a nice base on which I will add some weathering. Will work on that more tomorrow.
Its a bit blotchy, but that will be toned down when I do the next step of weathering.
On to Next Section
-T.
Faux Finish Fascia
click on images for larger version….

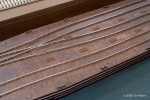
I decided to do a faux finish on the fascia to mimic an old rusty piece of steel. To start I used hardwood plugs to imitate rivets along the edge of the layout. 1/2″ holes were drilled 3″ apart along the top and bottom (top only completed in this image)

216 rivets were used. I counted.

Being short on time (I was doing this on Thursday for a show on Saturday) I decided to use a spray on primer that would dry very quick. One of the nice effects of this primer was it created a authentic texture to the surface.

Once the primer was dry I gave the edge a base coat of an orangy rusty colour.

Once the base coat was dry a watered down reddish browny paint was brushed onto the orangy rusty colour.

After applying the reddish browny colour the colour is blotted off with a damp sponge creating a texture.

I worked my way around layout applying 3 or 4 layers, each layer would create a deeper red colour to the rust effect. This image is after about 2 applications.

The next day a few more applications were added, along with some dark gray colouring along the bottom edge.


The dog barked his approval.


I’m quite happy with the results, it seems right at home on this style of layout, it looks like the front edge of a car barge that has seen lots of use in salt water.
This pretty much wraps up the benchwork construction for the layout, at least for now. Next up, rebuilding a brass boxcab for the terminal!
On to Next Section
-T.
Last bit of construction.
Yay!
Before I can finish off the fascia I still need to frame it in with plywood to give the Masonite I will be using proper support. Since this layout will likely get handled a lot I don’t want a flimsy fascia, the scorn of many a layout.

The curved edges required a bit of extra structure below the layout so the Masonite would be supported top and bottom.

Plywood added along the waterfront. 3/4″ Baltic birch cabinet grade plywood was used for maximum strength.

Borrowing the technique for laminating cabinets I decided to use water based contact cement to adhere the Masonite to the layout. This eliminates the need for screws and filler.

Contact cement has to be applied to both surfaces being glued together. The glue has to dry to tacky state and when the two surfaces touch, the bond is completed. You only get one try.

Typically the two surfaces do not require clamping, but the sharp radius around the outside edge was a bit much for the bond. Clamping the pieces will help form a very solid bond.

After about an hour the clamps can be removed and the bond is complete.

Using a laminate trimmer (router) the Masonite is cut off flush with the plywood. The Masonite I glued to the plywood was much wider then necessary, about 2″ per side. When wrapping around a corner it is very easy to get it a bit crooked, leaving lots extra to trim off after will ensure a perfect edge.


The other sections received the same treatment.
It was suggested to finish off the front of the layout in a rusty finish, which I think is a great idea and would suit the layout very well. I decided to also add some fake rivets as well.
On to Next Section
-T.