Weathering a Steam Engine
Resurrecting an old blog post
A few years back, on my old Port Kelsey Railway website, I wrote a photo essay on weathering a Proto 2000 0-8-0.� This was always a popular post so I thought I would move it over to this site.� The last several weeks have been a bit busy so I haven’t had much to post to the site, maybe this will fill the void a bit.� Enjoy!
-T.
Weathering ‘ol number 19, a photo essay
I had this engine over at a friends layout last week for an operating session. I had it doubleheaded with PKRY #22 which is a completely weathered engine, and coupled to a shiny out of the box engine it was quite a contrast. So I figured it was time to get it a bit dirty…
I took some pictures along the way so I could share the techniques I use.
Click on the picture for larger view…
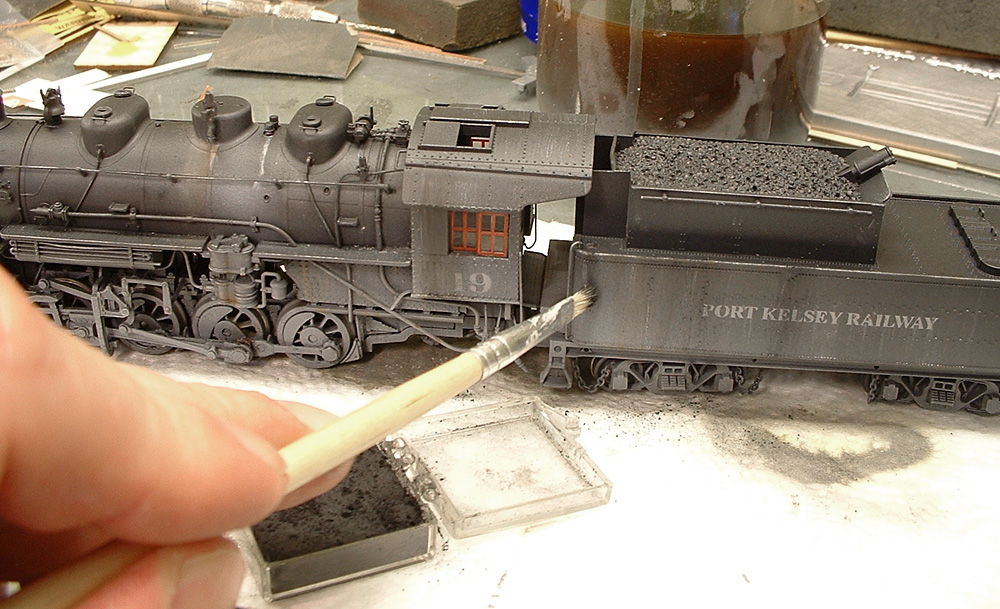
Image Copyright (c) 2005 Tim Warris
This is a Proto 2000 (or P2K as they are known) 0-8-0 I bought last year at a flea market, and was pleasantly surprised to find it had a sound decoder installed in it.
Click on the picture for larger view…

Image Copyright (c) 2005 Tim Warris
Click on the picture for larger view…
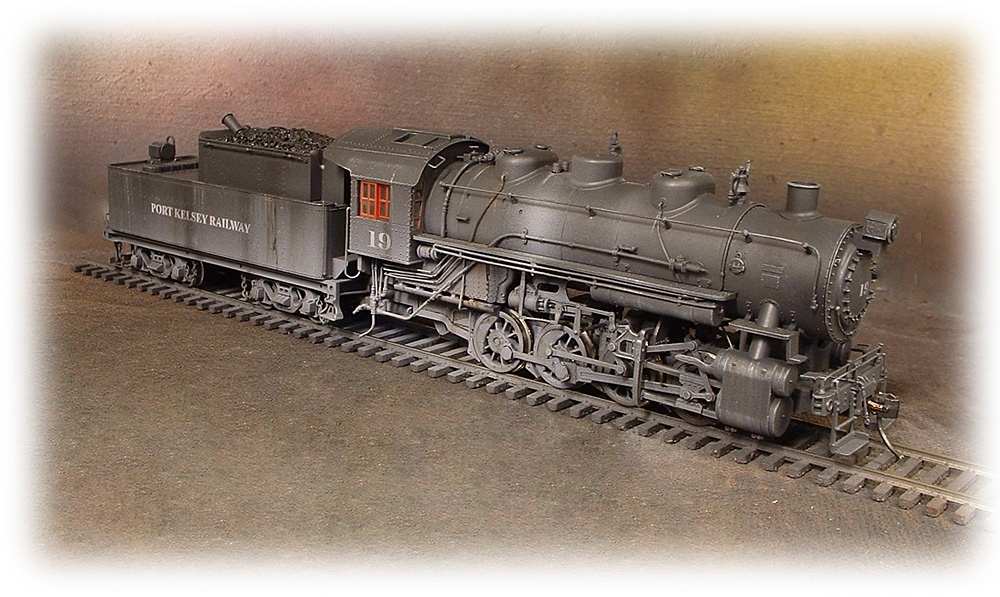
Image Copyright (c) 2005 Tim Warris
Follow along as this shiny new engine is converted into a more respectable version…..
The process I use to paint and weather a steam engine is a bit different from the norm. I hate disassembling steam engines, especially plastic ones, so I try to avoid this when possible. Fortunately P2K engines can be painted without any disassembly.
The only prep work I did to this one was to mask off the headlight and windows, everything else will get painted. This engine started life painted for CN. Since I repaint all the engines for the Port Kelsey I am not too concerned about its lineage, I just buy what ever is available.
Click on the picture for larger view…

Image Copyright (c) 2005 Tim Warris
To get an even coat of paint onto the drivers, I place the engine on a short piece of track and power it up. With the drivers spinning they can be evenly airbrushed.
Click on the picture for larger view…
Image Copyright (c) 2005 Tim Warris
I use Floquil paint exclusively. The nasty, deadly, stinky stuff. Works great, and I buy up old jars of it whenever I can find it. I also use a spray booth while I paint to get the stink out of the shop. It removes the paint smell too….
These engines come moulded in the exact shade of grey I feel an engine should be painted. I painted an engine black once, and regretted it. Models should not necessarily be painted the same color as the full size version, and this is especially true with steam engines. When painted completely black they disappear. A lighter shade of grey is a much better choice, this way the details can be seen at a distance, and they just seem to look right.
Even though this engine is already painted, I still prefer to give it a coat of paint. I never leave anything unpainted, it doesn’t look right even if the model is moulded in colour. Another thing to avoid on models is a shiny paint job, and moulded plastic always looks shiny.
Click on the picture for larger view…
Image Copyright (c) 2005 Tim Warris
With the wheels spinning, to ensure an even coat of paint without noticeable unpainted areas, the entire engine is painted. I use a mixture of Weathered Black, Engine Black and Primer to get the shade of grey I like. I add to this mixture some Floquil Glaze, which adds a slight sheen to the paint, which while not completely shiny, does add a slight bit of a gloss to the paint. I know I just contradicted myself there, but an engine should not be dead flat either, the best look is somewhere in the middle.
To the paint mix I add about 1/3 Diosol, this will thin the paint considerably and allow it to spray on much nicer. Don’t use anything other than Diosol with Floquil, other stuff will cause the paint to harden in the jar after a few months.
I only spray on a light coat of paint, since the engine is already close to the colour I want, it doesn’t take much paint to cover it up. I avoided painting the red window frames in the front of the cab. I didn’t mask these, it looked too difficult to do, so I just avoided putting paint there.
Click on the picture for larger view…
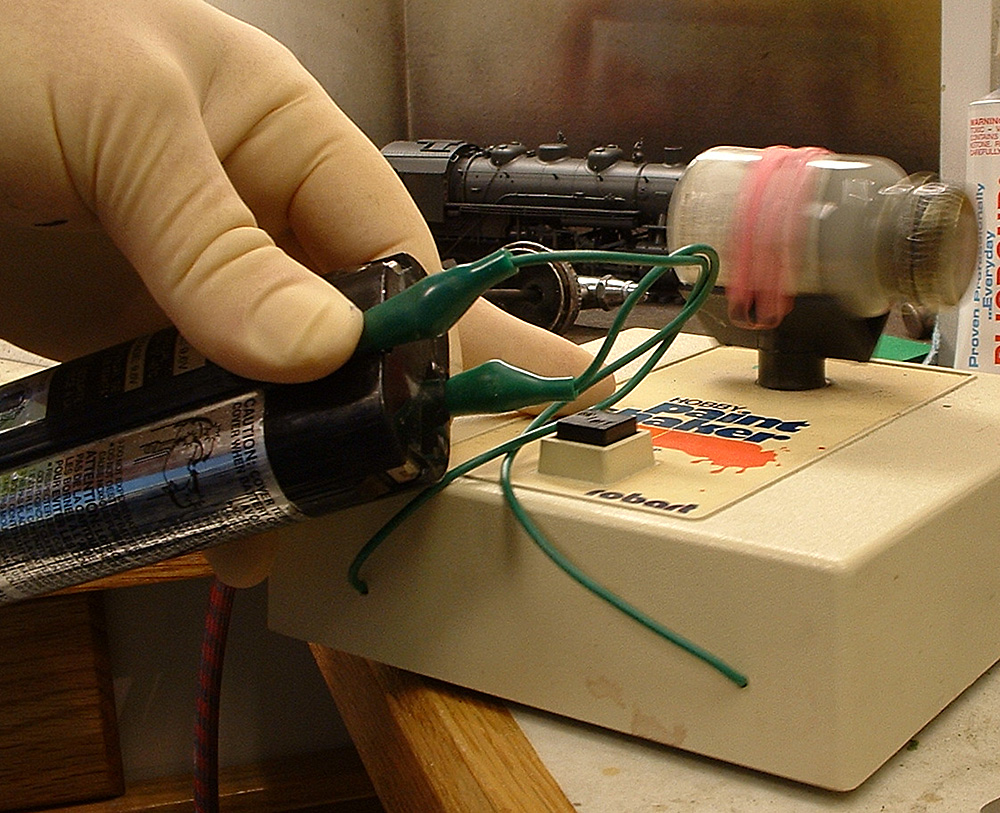
Image Copyright (c) 2005 Tim Warris
I bought one of these little paint shakers about 12 years ago, and even though people look at my like I’m nuts when I show it to them, it is undoubtedly the most useful tool when painting anything, next to the airbrush. Getting paint thoroughly mixed is key. I put a couple of nuts in the jar to act as agitators to help break up the paint.
Click on the picture for larger view…
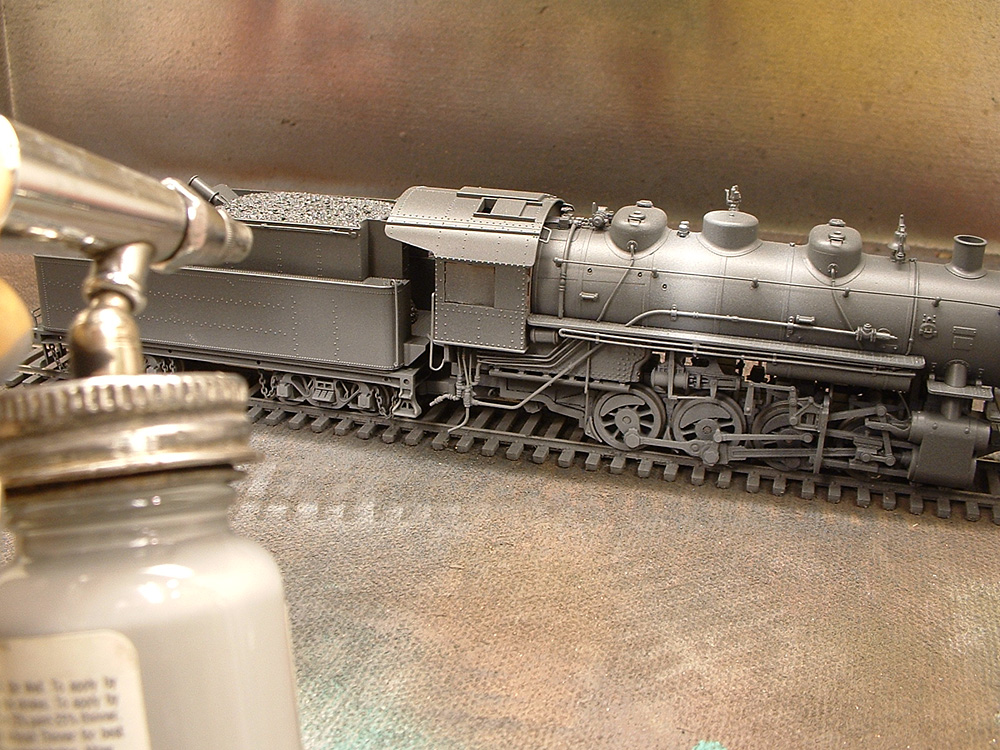
Image Copyright (c) 2005 Tim Warris
Floquil paint dries quick, actually, it goes on dry, so there isn’t much wait time between steps. With my paint nicely mixed, I’m ready to start the initial weathering. I use Primer for this step, its a good shade of grey.
Studying old colour images of steam engines I noticed a pattern to how they get dirty. The last driver, lower cab and first half of the tender turn almost white. My guess is all the crap blowing up from the tracks, mixed with steam exhaust. Again, with the wheels turning, I lay down the first layer of grey “dirt”. It is very important that the wheels are turning, otherwise areas will be missed, and this is very noticeable.
Vertical “streaks” are also very common on a dirty engine, I add these with Primer.
Click on the picture for larger view…
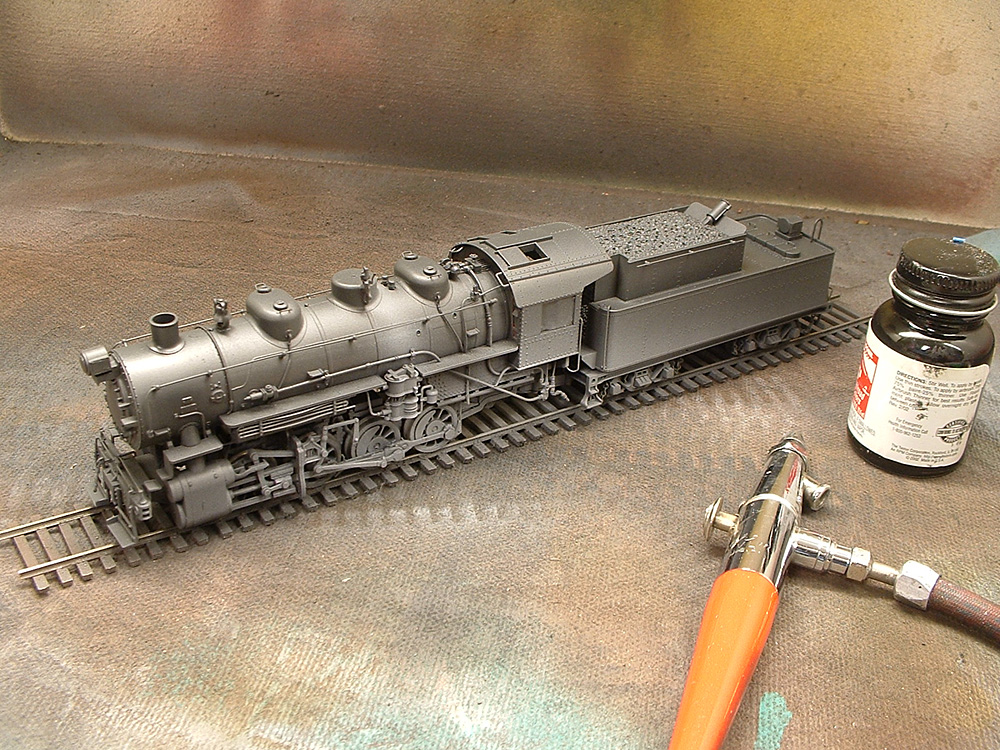
Image Copyright (c) 2005 Tim Warris
Thats all I do for now until the lettering is added to the engine.
Click on the picture for larger view…
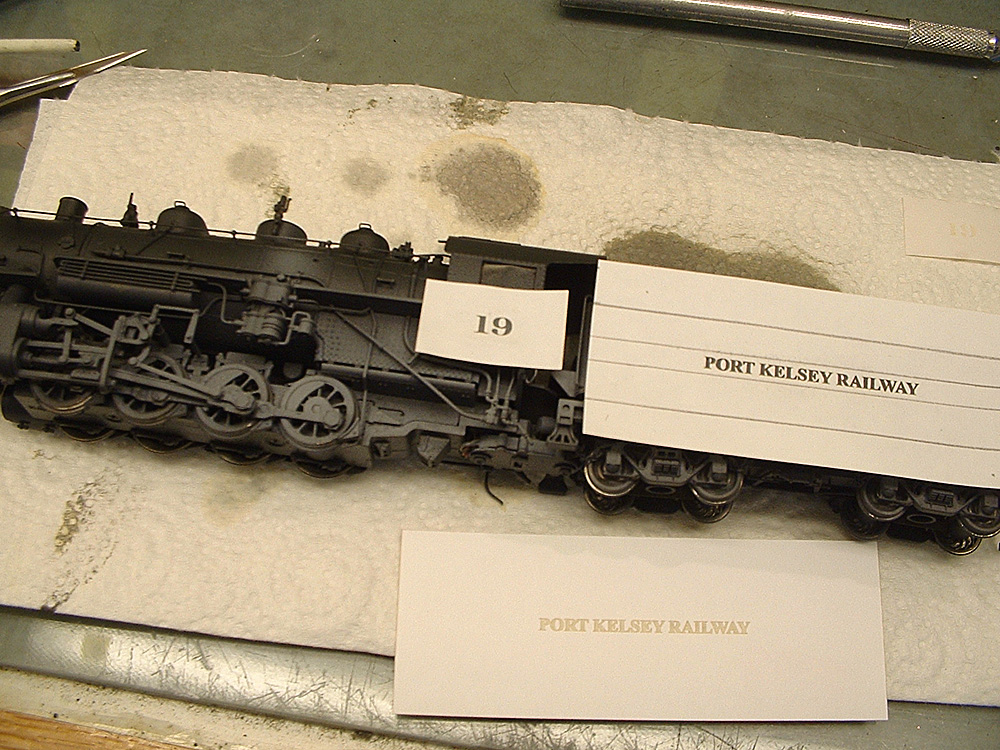
Image Copyright (c) 2005 Tim Warris
Okay, this is where I do things a bit different, and you will probably hate me for it. Having a laser engraver is very handy for all aspects of model railroading. I used the laser to “engrave” a stencil onto some sticker sheet, the kind you make labels from. I set the power settings on the laser so it will engrave through the paper, but not the backing sheet.
I have found lettering steam engines a very finicky, frustrating job. Typically I would use rub down letters, and always seem to run out of one letter. I have sheets of rub down letters laying around with no y’s left on them! I could never get them all straight either, so I would have to put lots of weathering on the tenders to hide the crooked lettering.
Anyway, since I have the laser I might as well use it to make life a bit easier…
Click on the picture for larger view…
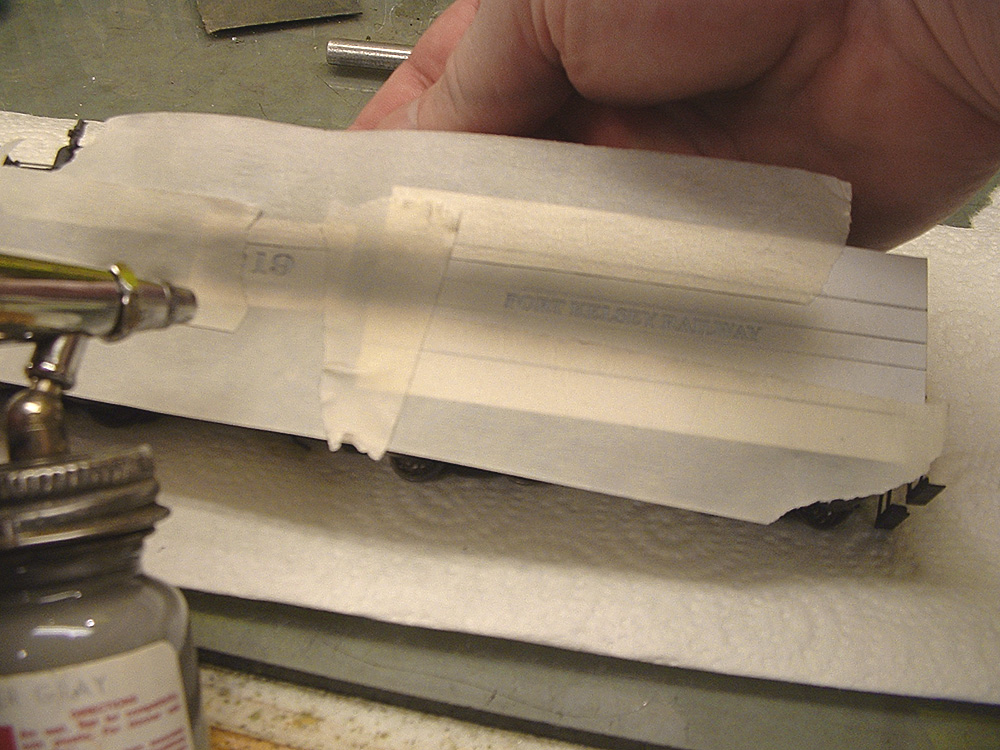
Image Copyright (c) 2005 Tim Warris
Using the laser to make the stencil I can spell out the full “Port Kelsey Railway”, instead of using “PKRY”, which I have done on several other engines.
I use Primer for this as well. White paint for lettering is far too bright, using a grey creates the illusion of white letters. A very light coat is sprayed on.
Click on the picture for larger view…
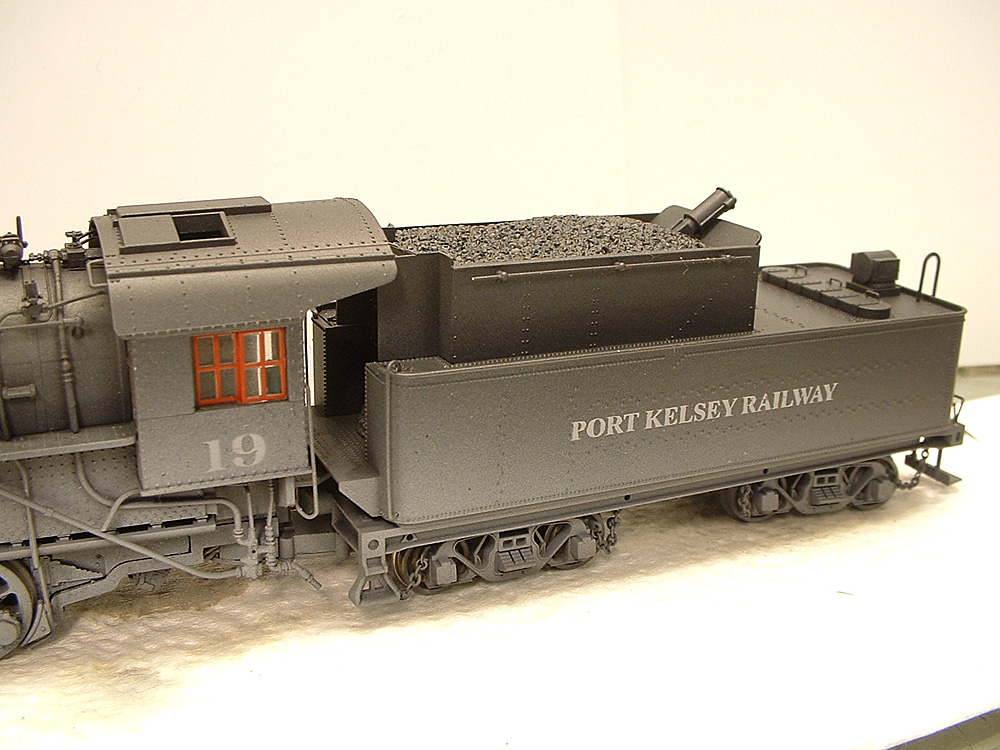
Image Copyright (c) 2005 Tim Warris
The same process is used for the back of the tender as well…
Click on the picture for larger view…
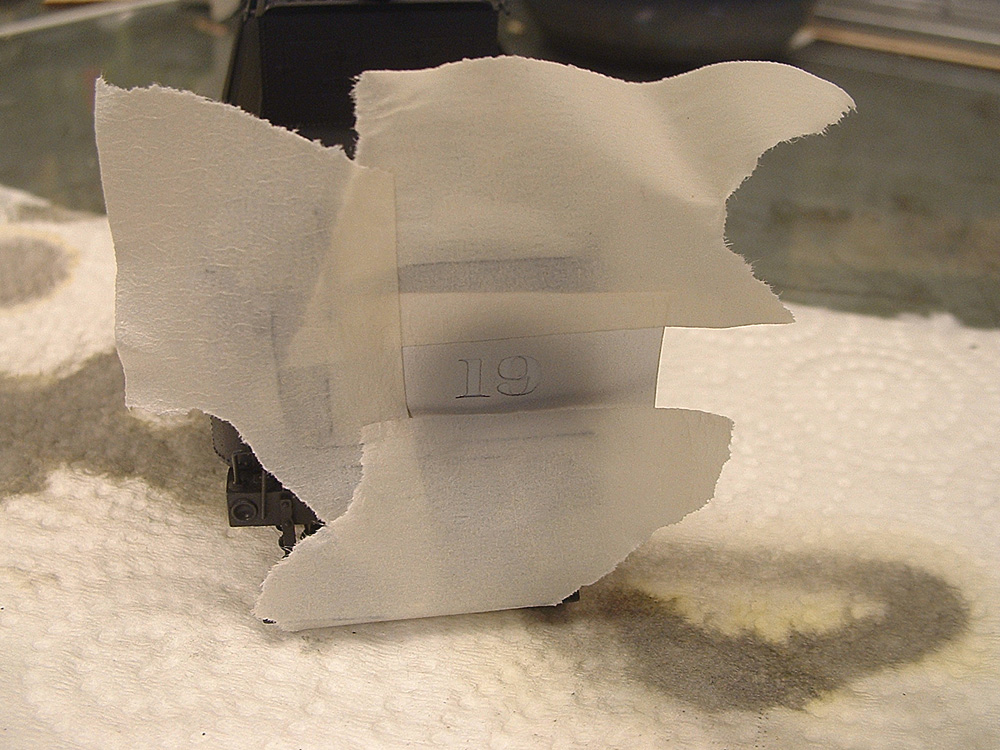
Image Copyright (c) 2005 Tim Warris
When using a stencil engraved onto paper, the inside of letters such as “P” and “O” have to be added in separately. These can be very small pieces, so I use a sharp scalpel blade to do this. Here I am using a scalpel to remove the middle of the “9” in 19 on the back of the tender after the painting is complete.
Click on the picture for larger view…
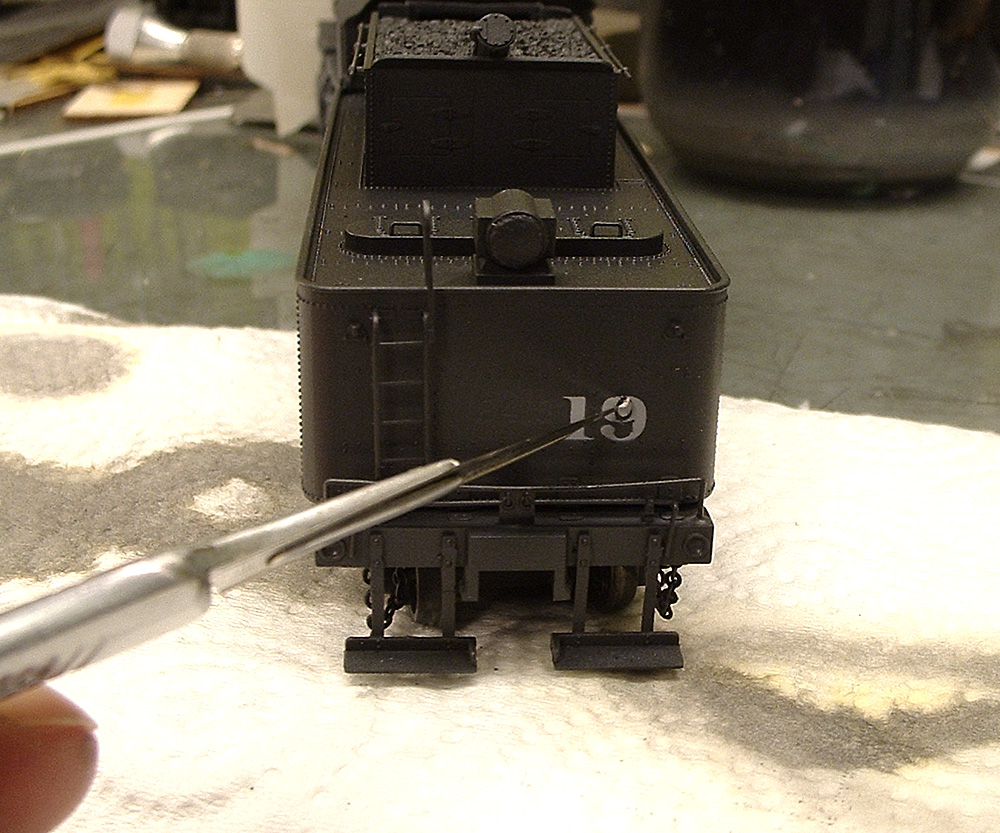
Image Copyright (c) 2005 Tim Warris
With the lettering complete, I return to the weathering process.
Heavily used steam engines are a series of vertical strips as rain and spilled water drags dust and grime down the sides of the boiler and tender . I apply these by hand with a fine brush and diluted paints of muted color. Shades of gray and rust are used.
Click on the picture for larger view…

Image Copyright (c) 2005 Tim Warris
Once all the streaks are added, I like to use chalks to further enhance the weathering. Black works great for adding in streaks of soot.
Click on the picture for larger view…
Image Copyright (c) 2005 Tim Warris
Weathering complete….
Click on the picture for larger view…
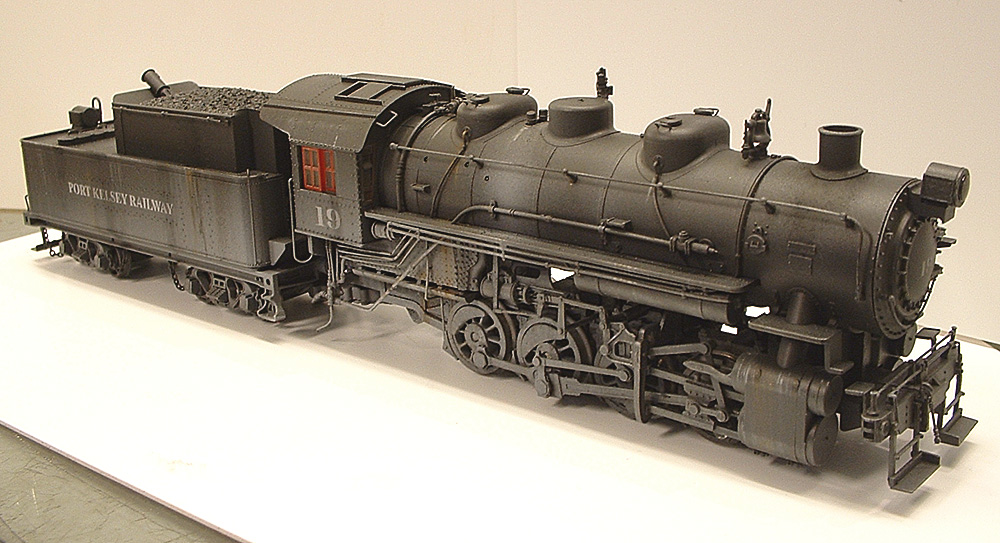
Image Copyright (c) 2005 Tim Warris
Click on the picture for larger view…

Image Copyright (c) 2005 Tim Warris
With the weathering completed, the only thing left to do is to add some decent looking coal to the tender.
Adding real coal to a steam engine is one of the most effective ways to improve on realism. I prefer to use two sizes of real crushed coal to create a texture to the load.
I wanted to model a tender that is almost empty, for some reason all model steam engines always have a full load of coal. Since this engine has a speaker already installed in the tender, there is no room to create the look of an empty tender, so I guess I have another full load.
I “painted” on some undiluted white glue onto the plastic coal load moulded into the tender, and sprinkled on some coal.
Click on the picture for larger view…
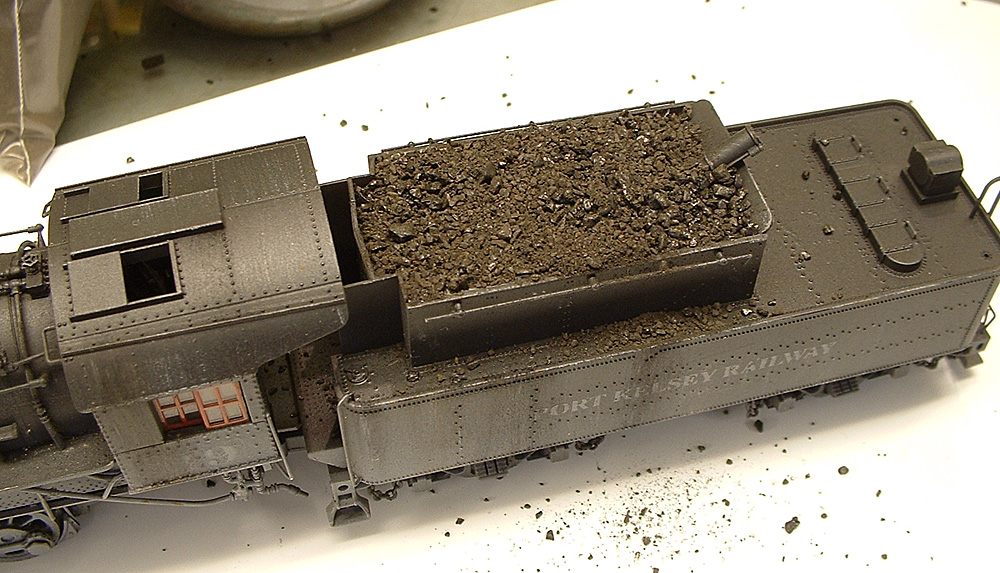
Image Copyright (c) 2005 Tim Warris
Click on the picture for larger view…
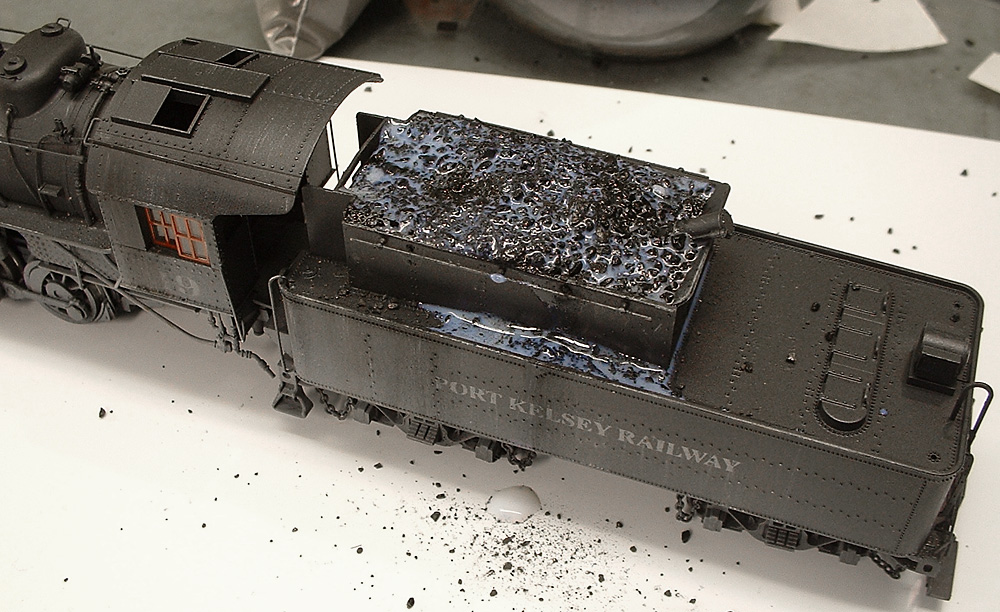
Image Copyright (c) 2005 Tim Warris
I added a few drops of rubbing alcohol onto the coal and followed with some Woodland Scenics scenic cement to glue it in place.
It looks like a mess, but it dries up completely invisible.
Click on the picture for larger view…
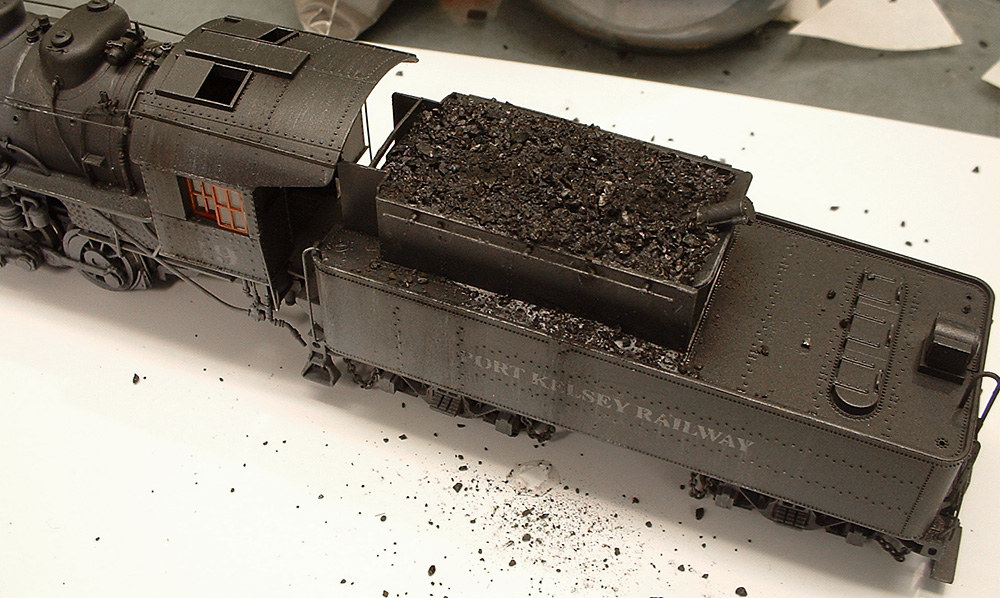
Image Copyright (c) 2005 Tim Warris
This is after about 10 hours drying, or one Christmas party. (thats where I went while I waited for the glue to dry)
Click on the picture for larger view…
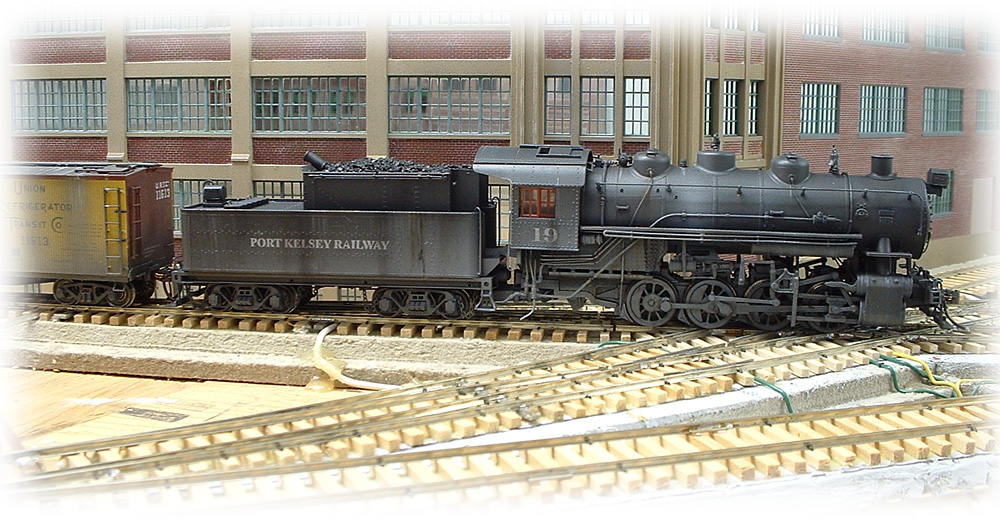
Image Copyright (c) 2005 Tim Warris
Click on the picture for larger view…
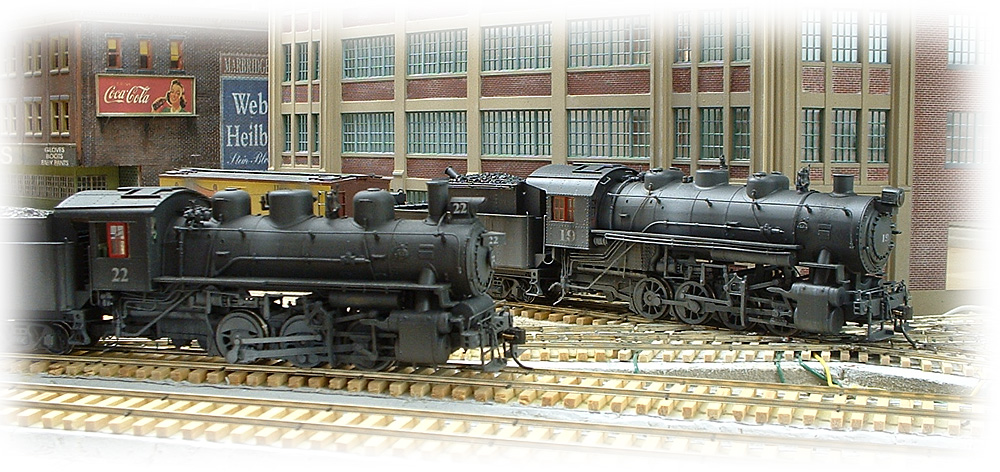
Image Copyright (c) 2005 Tim Warris
Sitting with PKRY #22, a good match.
Click on the picture for larger view…
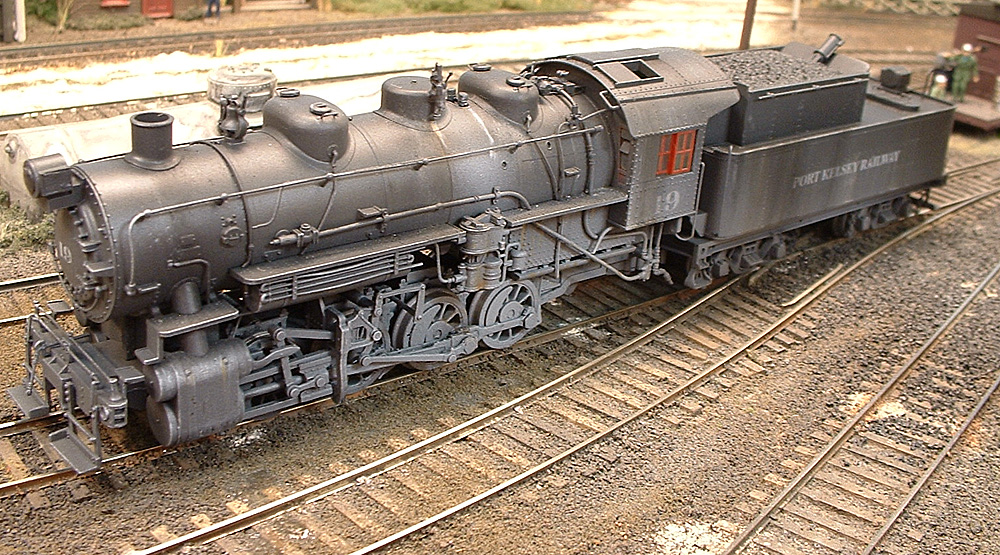
Image Copyright (c) 2005 Tim Warris
Weathering equipment makes a big difference to the overall layout. It isn’t too difficult to do, but can take a bit of practice to develop the techniques that work for you.
The best way to learn is to study prototype images of weathered equipment, or even photos of other models. Pick up some old train cars at a flea market to practice on.
An airbrush is a very valuable tool for this. All it takes is a quick shot of dark grey along the bottom of a car to greatly improve its appearance. From there add a few streaks and before you know it you are addicted.
Engines are a little more advanced, but again, worth the effort.
-Tim
About the Author:
I'm your host, Tim Warris, a product developer in Port Dover, Ontario. Since March of 2007 I have been documenting the construction of the former CNJ Bronx Terminal in HO scale. For my day job, I design track building tools for Fast Tracks, a small company I own and operate. Fast Tracks makes it fast and easy to hand lay your own trackwork. Stop by our website to learn more!
Posted by: Tim | 07-09-2008 | 10:07 AM
Posted in: Latest Posts | Weathering

Great article about weathering! I plan to start a weathering on some old freight cars… But airbrush is not an option. Hope to achieve something without it.
BTW, third photo is not present in the article.