I think this is the forth or fifth video of me cutting gaps in trackwork. This one should be the last. I have been asked numerous times how I am going to make this layout work, which is not a surprising question with complex trackwork such as this. From the beginning I designed all the track sections to operate, but until this stage in construction, where I can install the track permanently onto the layout, I could not cut the final electrical isolation gaps as it makes the track sections weak and prone to damage if handled. Once glued down they will be fine, but left loose and being transported often, they were prone to damage.
Well this week, they were finally completed. Yay!
The video above shows the cutting of the most complex piece of trackwork, the triple lapped turnout that leads into the engine house.
The gaps were all cut with a jewelers saw as this allows me to cut small precise gaps in tight locations. Had I tried to cut these gaps using a rotary tool I would have certainly nicked, or completely cut the adjacent rails. Also, the heat generated would melt the solder joints. A jewelers saw is the best option for this.
The trackwork cut in this video took about 3 or 4 hours to cut as I worked slowly and methodically.
I'm your host, Tim Warris, a product developer in Port Dover, Ontario. Since March of 2007 I have been documenting the construction of the former CNJ Bronx Terminal in HO scale. For my day job, I design track building tools for Fast Tracks, a small company I own and operate. Fast Tracks makes it fast and easy to hand lay your own trackwork. Stop by our website to learn more!
With the NMRA Train Show rapidly approaching, I am focusing hard on getting this damn thing running. Reaching that goal will take a lot of work over the next weeks. This week, I am spending most of my time working on the layout, and so far I am making pretty good progress.
It took two full days to cut all the rail isolation gaps in all the trackwork. I worked very slowly and carefully being careful not to damage any of the trackwork and also to be certain I didn’t miss any. Missing one would be very not good. Some of the gaps can not be cut after the track is installed as they have to be done using a jewelers saw due to the tight clearances involved. Most of my time was spent studying the individual track pieces and determining where to make the cuts.
After the gaps were cut, they sections were tested with a continuity checker to make sure there were no shorts or missing gaps.
The job wasn’t as bad as I thought it would be.Until this stage in construction I could not cut any of the gaps as it makes the track sections weak, and I needed to handle them quite a bit, so I delayed the job until the last possible minute. This meant spending 2 years thinking about it and answering the question, “how you going to wire that thing?”.
Today, I fit all the sections together and soldered them into a single piece. All the missing PC board ties have been added in. It is now, finally, all sitting in place. This was another job I have been thinking about for two years!
It all went together well, fitting very precisely and seems to run smoothly when I push a car or two through it. Until the switch machines are installed, its very difficult to tell how well it will actually run as the switch points don’t yet seat precisely, need the switch machines to hold them tight in place.
I still have another piece of trackwork to make, one final turnout. I will make that one up tomorrow and install it into the rest of the trackwork. Other than the straight yard tracks, its the trackwork construction is pretty much complete.
Will have to make up a “Golden PC Board Tie” and have a little ceremony with some local dignitaries for the last solder. There will be speeches and polite applause.
A local dignitary inspecting some trackwork. He barked in lieu of applause.
I'm your host, Tim Warris, a product developer in Port Dover, Ontario. Since March of 2007 I have been documenting the construction of the former CNJ Bronx Terminal in HO scale. For my day job, I design track building tools for Fast Tracks, a small company I own and operate. Fast Tracks makes it fast and easy to hand lay your own trackwork. Stop by our website to learn more!
I made a post a some time back about cutting the necessary electrical isolation gaps for the complex trackwork in the terminal. Over time it has gotten buried in the posts and since it is a question that comes up quite often I thought I would re-post it here. I have also created a category on the right hand side of the site called “Cutting Gaps” that will keep this post easily accessible.
The gaps in the PC board ties were all cut with a triangle file. The gaps in the rails are all cut using a jewelers saw. Using a jewelers saw allows the blade to be removed from the saw and slipped between the ties and then re-attached to the saw. The rail is then carefully sliced using a fine blade. This leaves a very thin gap that is almost invisible. Since the rail is soldered to all PC board ties, there is no chance (OK, little chance) that the gaps will ever be able to close up, so no filler is necessary.
Gapping complex trackwork.
The number one thing I get asked about when someone sees this trackwork is “how will you wire this?”. Seeing all those frogs it looks very complex but once you understand the basics of where to isolate sections of track you develop an eye for where to cut the gaps.
I design a lot of complex trackwork and part of the design is determining where modelers will need to cut gaps to have the trackwork operate properly. DC or DCC, the gapping is the same when building ultra-reliable track. To have trackwork (turnouts and crossings) work without shorts or equipment stalling it is necessary to “cut the frogs out”, that is to completely isolate the frog from the rest of the turnout and feed power to the frog independently from the turnout. Power is supplied to the frog from either a switch machines contacts or from a ground throw that has contacts on it.
The link will show a animated rendering showing how this works….
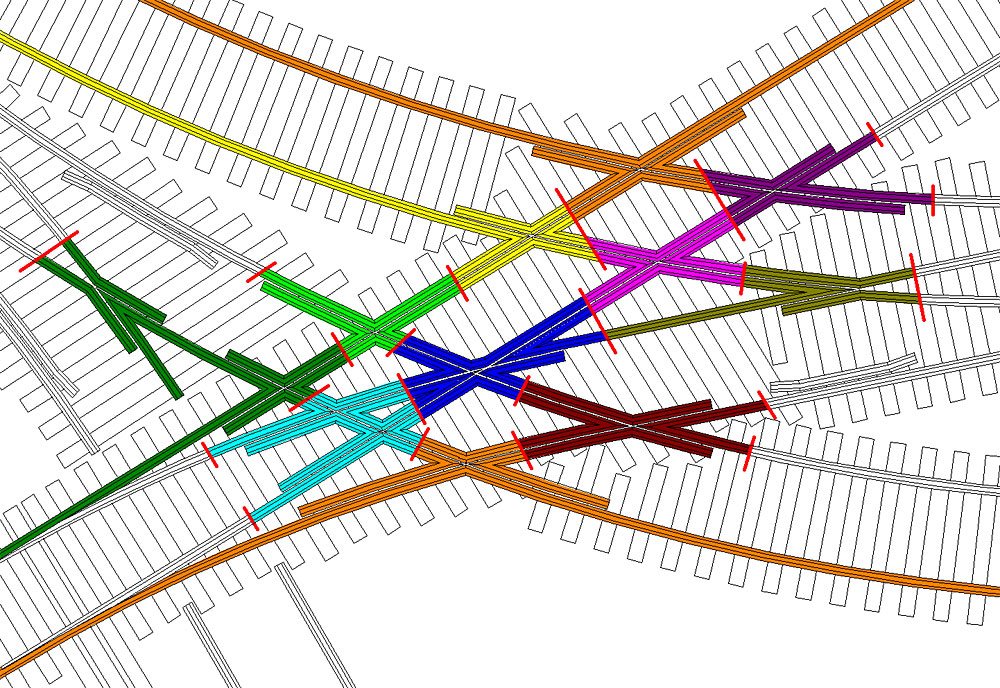
The “polarity” of the frog is set to match either the “north” or “south” rail depending on which way the turnout is set. The same is true for multi frog trackwork. Each location where two rails cross each other (frogs) will need to be isolated from the rest of the track and powered independently based on the route selected.
Image Copyright (c) 2007 Tim Warris
What I have illustrated here is all the different frogs in the first section of trackwork I built. The gaps cut through the rails are shown in red. After studying the drawing for a while and thinking how a train would run through the trackwork I determined where each frog would have to be cut using a jewelers saw. (Link to article on this technique)
Power will be fed to each frog from the contacts of switch machines relative to the route selected. Additional contacts will be needed and will be supplied from relays connected to the switch machine contacts.
It isn’t as difficult as it appears, but when complete there will be lots of wires feeding all the different frogs, which does make it appear complex, but in reality it is the same circuit repeated several times. You end up with stuff like this…
But it runs 100% reliably!
-Tim
Gap Update
Oops.
A sharp eyed modeler pointed out a mistake in the gapping in the section shown above. The Blue/Pink/Green frogs can all be a single section, like in the image below….
The logic being that only a single train can travel over the entire pink section at a time, therefore it isn’t necessary to isolate the three frogs, it can be left as a single section.
Thanks to David at The Gauge for pointing this out. It will save a few wires!
-Tim
About the Author:
I'm your host, Tim Warris, a product developer in Port Dover, Ontario. Since March of 2007 I have been documenting the construction of the former CNJ Bronx Terminal in HO scale. For my day job, I design track building tools for Fast Tracks, a small company I own and operate. Fast Tracks makes it fast and easy to hand lay your own trackwork. Stop by our website to learn more!