Home

The Doors

Hang time

Hanging Doors

The Bronx project has stalled a bit the last few days.  I am in the middle of a major Honey-do.  I suspect a few more weeks and I should be back at the layout in earnest….

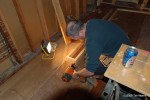
This weekend I am working on installing a few new doors in what will eventually be a bedroom.

Hanging Doors

The door into the room from the hallway had to be completely replaced, including the door jam.  The old door and jam had been hacked up pretty good,  I think the last attempt at a reno involved axes.  Instead of trying to restore the old door I decided to replace it.  Actually, all the doors on the second floor will be replaced with new ones, but I think I will only have to replace this one door jam.

Hanging Doors

Of all the jobs in house renovating, installing a door is by far the more difficult.  Nothing is more evident that a poorly hung door.  To date, I  don’t think I have done one to my satisfaction.  Perfect door hangage requires the the following features:

  1. Level
  2. Plumb
  3. Square
  4. 1/8″ to 3/16″ space on the hinge side
  5. Parallelism to 1/32″
  6. Precise installation of hinges (damn near impossible)
  7. No play between the door and the jam
  8. No binding between door and the jam
  9. Door will not pivot on its own.
  10. Latch functions correctly
  11. I’m sure there is something else

These doors are all pretty good, but next time they will be a bit better…

Hanging Doors

The outside of the room.  I installed the new jam wiithout removing all of the old trimwork.  Removing it would start a chain reaction of projects that would lead to tearing down the house.  This ment working within the accuracy of the original trimwork that wasen’t too bad, but not perect.  I will blame any error in my install on that.

Hanging Doors

I’d give this install a 9 out of 10.  I’m not happy with the location of the hinges.  The striker plate could be better too.

Hanging Doors

The second door in the room leads into the laundry room.  This one, I’d give an 8 out of 10.  Again, not happy with the striker plate.  Everything else is pretty good.  100% better than the useless bi-fold door disaster that was there before.

Hanging Doors

Hanging Doors

Hanging Doors

I managed to install two doors today, which is a record for me.  If installing a simple pre-hung door, getting several of them done in a single day would be easy.  These are doors that need the hinges and handles installed, and also complete door jams built.  That slows down production quite a bit.

They are done.  Tomorrow I will start the electrical and be that much closer to returning to the layout project.

That is all I have to say about installing doors.

-T.

About the Author:

I'm your host, Tim Warris, a product developer in Port Dover, Ontario. Since March of 2007 I have been documenting the construction of the former CNJ Bronx Terminal in HO scale. For my day job, I design track building tools for Fast Tracks, a small company I own and operate. Fast Tracks makes it fast and easy to hand lay your own trackwork. Stop by our website to learn more!

Posted by: Tim | 12-14-2008 | 12:12 AM
Posted in: 2007 NMRA Train Show - Detroit | Latest Posts | Our Old House | Comments (2)

Picture(s) of the Day – Dec. 8, 2008

Low cost help

It seems that all home renovation projects take place in the winter, and on the second floor.

Fortunately, I have some cheap labour.

Here is a gallery of pictures of Vita being a good egg and trucking in some 2×6’s from the shed. In the snow. This weekend it was -200C outside.

I took the pictures from the safety of the house. I’m the bewiskered balding guy in the last picture driving a nail into my knee with a nail gun.

-T.

About the Author:

I'm your host, Tim Warris, a product developer in Port Dover, Ontario. Since March of 2007 I have been documenting the construction of the former CNJ Bronx Terminal in HO scale. For my day job, I design track building tools for Fast Tracks, a small company I own and operate. Fast Tracks makes it fast and easy to hand lay your own trackwork. Stop by our website to learn more!

Posted by: Tim | 12-08-2008 | 11:12 PM
Posted in: Latest Posts | Picture of the Day | Comments Off on Picture(s) of the Day – Dec. 8, 2008

Switch Points

Pivot Points

Once again we are getting some wonderful December weather, so its another good evening for some trackwork.  (I’m note sure what the little green eyes are watching.)

After another battle with the upper portion of the house, I am a little tired, so I only worked for a bit on the layout this evening.

I need to get a reliable method worked out for the numerous switch points on the layout.  Most of the points are very short, about an inch or so, so traditional methods won’t work.

The points were initially soldered in place onto  a temporary throwbar,  Now, I need to cut them off and pivot them with a hinge.  Its the only way to make short points work.

Cutting the points free is easily accomplished with a jewelers saw.  The blade can be taken off one end of the saw and fed between the ties and re-attached.  The points are sliced free.

To act as a hinge I cut a code 70 rail joiner to about 2/3 its original length.  To hold it while cutting, I slipped it onto a piece of rail held in a PointForm tool.

Hinges (rail joiner) soldered in place at the end of the switchpoints.  These hold the rail in proper alignment with the stock rail, but still allow the points to pivot enough.

Most of the time this method will work fine with the points soldered to the throwbar, there is enough play in all the parts to allow the points to pivot reliable.  With unusually short points this method won’t work.

I can move them well enough, but I am not confident that it will last, there is a bit of tension in the solder joints that I believe is a bit too much and will probably fail.

I have decided to use a method I described a few years back in a Fast Tracks Newsletter (Ok, 5 years ago)

This technique uses a spike that has had the blackening filed off.  This spike is inserted into a PC board throwbar that has had the copper foil removed.  The spike is then soldered to the switchpoint.  This allows the spike to act as a hinge that can freely pivot.

Since the forces being asserted onto the solder joint are not under stress, the joint is unlikely to fail.  All the pressure of the switch machine will be on the shank of the spike, not on the solder joint, all the solder is doing is pulling the point back open.   Its important to get a solid solder joint, removing the blackening from the spike can not be skipped.

This technique works very well and the points move freely.  Its a bit fiddly, but worth the effort.

One down, 27 to go…

-T.

On to Next Section…

About the Author:

I'm your host, Tim Warris, a product developer in Port Dover, Ontario. Since March of 2007 I have been documenting the construction of the former CNJ Bronx Terminal in HO scale. For my day job, I design track building tools for Fast Tracks, a small company I own and operate. Fast Tracks makes it fast and easy to hand lay your own trackwork. Stop by our website to learn more!

Posted by: Tim | 12-06-2008 | 11:12 PM
Posted in: Latest Posts | Comments (4)

« Previous Entries   Next Entries »